Table of Contents
In today’s digital world, companies, marketers, and creators must make videos people want to watch. Veed.io features have grown into a robust platform that makes it easier to make videos, giving you the power to create content that has an impact quickly.
This website, Veed.io, has many valuable tools that let you:
- Edit movies without much trouble: For smooth cutting, trimming, and adding changes, use an easy interface for anyone to understand.
- Improve your pictures: You can use a vast library of stock footage, music, and images to make your video look better.
- Engage more people: Add polls, games, and calls to action (CTAs) to keep people interested.
- Work together efficiently: Collaborate with your team in real time to create quick content!
- Maximize your reach: You can quickly post your videos to social media sites and track how well they do.
Find out everything you need to know about how to use Veed.io in this blog post. We’ll go through a step-by-step process that will teach you how to use this cutting-edge platform to its fullest and make videos your audience will want to watch.
Step-by-Step Guide to Veed.io Features
How to Use Veed.io for Video EditingNow that you’re familiar with the critical benefits of Veed.io features, let’s embark on a step-by-step exploration of how to use Veed.io. We’ll delve into several vital features to empower you to create professional-looking videos easily.
Video Editing Tools
Veed.io boasts a user-friendly editing suite that allows you to transform raw footage into polished content.
Importing & Uploading Media
- Click the “Create” button on the Veed.io dashboard.
- Select “Upload Files” to choose videos, images, or audio files from your device.
- Alternatively, explore the “Stock Footage” and “Stock Music” libraries to discover royalty-free media assets.
Trimming & Cutting
- Drag the play head to your clip’s desired starting and ending points.
- Click the “Scissors” icon to split the clip, or use the “Trim” buttons to adjust its length.
Adding Transitions
- Select the clip you want to add a transition between.
- Click the “Transitions” tab in the top menu.
- Browse the available transitions and drag your preferred option between the two clips.
Tips: Utilize keyboard shortcuts (e.g., I/O for trimming) for faster editing. Experiment with different transition styles to create a smooth flow between clips.
Text & Overlays
Enrich your video’s narrative with text overlays and visual elements.
Adding Text Overlays
- Click the “Text” tab in the top menu.
- Choose a pre-designed text template or create a custom one.
- Edit the text content, font style, size, and color to match your branding.
Overlays & Stickers
- Click the “Overlays” tab in the top menu.
- Explore the shapes, icons, and stickers library to enhance your video’s visual appeal.
- Drag and drop the desired overlay onto your video timeline and adjust its position and size.
Tips: Maintain a consistent text style throughout your video for a professional look. Use overlays strategically to highlight critical points or add a touch of fun.
Stock Media Library
Elevate your video’s production value with royalty-free stock footage and music.
Accessing Stock Media
- Click the “Stock Footage” or “Stock Music” tab in the top menu.
- Utilize the search bar or browse through categorized collections to find relevant assets.
Using Stock Media
- Click on the desired stock footage clip or music track to preview it.
- Click the “Add to Project” button to incorporate it into your video timeline.
Tips: Choose stock media that aligns with your video’s theme and target audience. Use background music to set the mood and enhance the viewing experience.
Collaboration Features
Veed.io fosters seamless teamwork, allowing you to work with colleagues on video projects.
Inviting Team Members
- Click the “Share” button in the top right corner of your project.
- Enter the email addresses of your team members and select their access level (e.g., editor, viewer).
- Click “Send Invite” to grant them access to the project.
Real-Time Collaboration
- Invited team members can access the project through the shared link.
- They can make edits, leave comments, and provide feedback within the platform.
Tips: Clearly define roles and responsibilities for each team member. Utilize comments to communicate specific edits or suggestions.
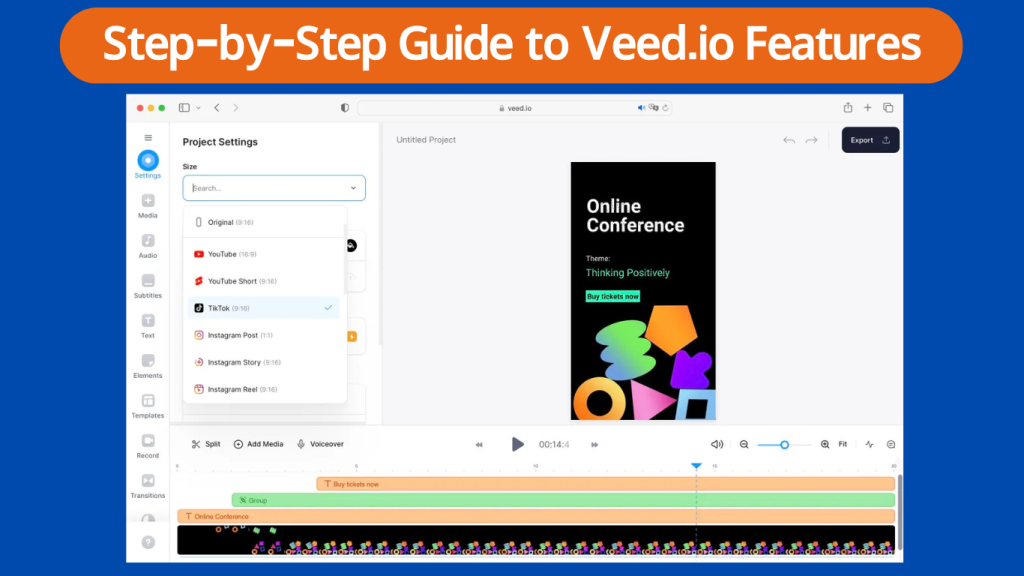
Publishing & Analytics
Once your video is complete, leverage Veed.io’s publishing and analytics tools to share your content and track its performance.
Publishing to Social Media
- Click the “Publish” button in the top right corner.
- Select the social media platforms where you want to share your video (e.g., YouTube, Facebook).
- Customize the video title, description, and thumbnail image.
- Click “Publish” to share your video directly to the chosen platforms.
Tracking Analytics
- Click the “Analytics” tab in your project dashboard.
- View key metrics such as views, engagement rate, and click-through rate.
Tips: Choose the optimal publishing time for each social media platform. Analyze your video’s performance data to gain insights and refine your content strategy.
This is just a glimpse into the vast capabilities of Veed.io. With its intuitive interface.
Interactive Elements
Boost audience engagement and interactivity within your videos with Veed.io’s unique features.
Adding Polls and Quizzes
- Click the “Interactive” tab in the top menu.
- Choose the desired poll or quiz format (e.g., multiple choice, yes/no).
- Customize the interactive element’s questions, answer options, and visual design.
- Drag and drop it onto your video timeline at the desired location.
Creating CTAs (Call to Action)
- Click the “Interactive” tab and select the “Call to Action” option.
- Choose a pre-designed CTA template or create a custom one with your desired text and button style.
- Link the CTA button to a website, landing page, or social media profile.
- Position the CTA on your video timeline at the strategic point where you want viewers to take action.
Tips: Utilize polls and quizzes to gather audience insights and make your content more engaging. Craft clear and concise CTAs that inspire viewers to click and convert.
Screen Recording & Voiceovers
Veed.io empowers you to create explainer videos or tutorials by incorporating screen recordings and voiceovers.
Screen Recording
- Click the “Screen Record” button in the top menu.
- Choose to record your entire screen or a specific window.
- Click “Start Recording” to capture your screen activity and audio (if desired).
- Click “Stop Recording” to finalize the capture. The recorded screencast will automatically be added to your project.
Adding Voiceovers
- Click the microphone icon on your video timeline to initiate voice recording.
- Speak your narration clearly while the video plays.
- Click the “Stop” button to finalize the voiceover recording.
Tips: Use a clear and concise script for your voiceover to maintain a smooth flow. Edit the voiceover recording to remove any background noise or errors.
This is just a glimpse into the vast capabilities of Veed.io. With its intuitive interface and comprehensive features, Veed.io empowers you to streamline your video creation process, craft engaging content, and achieve your marketing or creative goals.
Pro Tips and More Advanced Veed.io Features
It would be best if you had a good idea of how Veed.io works at its core. To improve your video-making experience, here are some more tips and tricks:
- Learn shortcuts for the keyboard: To speed up your work, use computer shortcuts for editing tasks like trimming, cutting, and copying.
- Templates and branding: You can save time by making templates with your brand’s colors, fonts, and logos so that all your movies look the same.
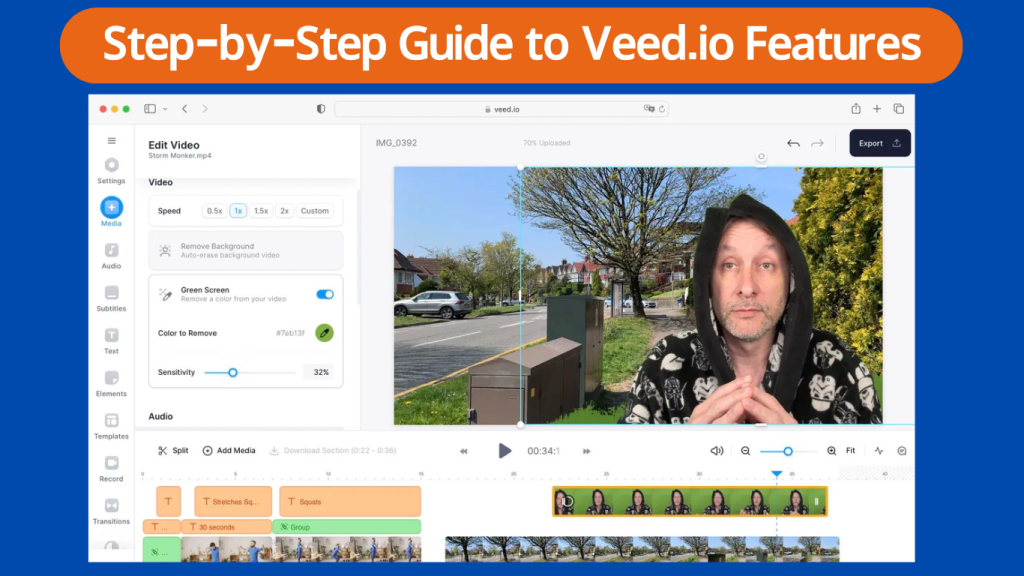
- Changes to the video speed: You can change the speed at which your clips play to make slow-motion effects like time-lapses or to draw attention to certain parts of the video.
- Chroma Key (Green Screen): With a chroma key, you can replace a green screen background with any picture or video you want, taking your video production to the next level. Keep in mind that this is a more advanced function.
There are a lot of advanced tools on Veed.io that are outside the scope of this guide. As you learn more about the platform, you’ll find features like organizing posts for social media, tools for optimizing videos for SEO, and connections to other marketing platforms. To get the most out of Veed.io, don’t be afraid to look through its vast library of lessons and other valuable materials.
Conclusion
In this guide, we’ve looked at some of the cool features of Veed.io. It’s a powerful tool that helps businesses, marketers, and content creators make videos. We’ve talked about features like editing tools that are easy for anyone to use, text overlays, a vast library of stock images, features that make working together easy, and publishing and stats built right in.
With Veed.io’s tools, you can speed up making videos, create exciting content your audience will enjoy, and reach your business or creative goals.
Are you ready to unleash your video-making potential? Get a free Veed.io account right now and try out all of the platform’s features. Check out the many tutorials and other tools, and feel free to go deeper into the advanced features to get the most out of Veed.io. Go to Veed.io to find out more and start making great videos!
FAQs
Q: What is Veed.io?
A: Veed.io is a powerful online video editing platform allowing you to create, edit, and share professional-quality videos easily.
Q: Is Veed.io free?
A: Veed.io offers a free plan with limited features. You can subscribe to a paid plan to access advanced functionalities and unlimited video exports.
Q: Can I use Veed.io on my mobile device?
A: Yes, Veed.io is compatible with desktop and mobile devices, making it convenient to edit your videos on the go.
Q: Can I add text, overlays, and effects to my videos? A: Absolutely! Veed.io provides a wide range of text, overlay, and effect options to customize your videos and make them visually appealing.
Q: Can I use stock footage or music in my videos?
A: Yes, Veed.io offers a library of royalty-free stock footage and music that you can use to enhance your video content.
Q: Can I collaborate with others on a video project?
A: Yes, Veed.io allows you to invite team members to collaborate on your projects, making it easy to work together and share feedback.
Q: Can I publish my videos directly to social media platforms? Yes, Veed.io lets you publish your videos directly to platforms like YouTube, Facebook, and Instagram with just a few clicks.
Q: Can I track the performance of my videos?
A: Yes, Veed.io provides analytics tools to help you track views, engagement, and other metrics for your videos.
Q: Does Veed.io offer advanced features like green screen effects or video speed adjustments?
A: Yes, Veed.io includes advanced features that allow you to create professional-looking videos with effects like green screen and speed adjustments.
Q: Can I integrate Veed.io with other tools or platforms?
A: Yes, Veed.io offers integration options with popular tools like Canva and Zapier, expanding its functionality and versatility.